Duplex Proxy Setup
Below you will find instructions on how to setup a duplex proxy setup. Once you complete the walk-thru you will find it is very easy to add multiple proxies to your chain using the same technique shown here.
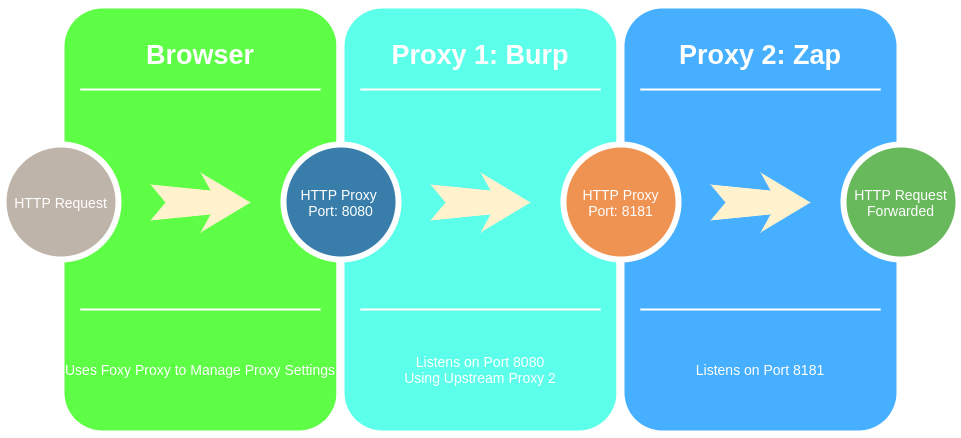
Here is a quick overview of the setup, we will be chaining both proxy servers together. This will allow us to leverage both tools during our web application testing with minimal effort.

Proxy 2: Zap Setup
First ensure you have ZAP installed. For Kali Linux this could be done with ‘apt-get install zaproxy’.
Once installed open Tools > Options

From the options menu find the Local Proxies section, and modify the Port number to something other than 8080. For our example we configure the port 8181 to setup our ZAP proxy.
Now save and exit Zap proxy to save these settings (this may not be required but I have found it best).

Now you can launch Zap proxy again and verify it is listening.
netstat -antpln | grep 8181
(Not all processes could be identified, non-owned process info
 will not be shown, you would have to be root to see it all.)
tcp6       0      0 127.0.0.1:8181          :::*                    LISTEN      23824/java
Proxy 1: Burp Setup
We launch Burp and edit the User options to add an Upstream Proxy Server. We use the same settings we used to configure our ZAP proxy. In this case we add an upstream proxy with port 8181

Browser Setup
Now we just need to setup our browser. For our example we will use Firefox with the Foxy Proxy plug-in.
You can find the plug-in here: https://addons.mozilla.org/en-US/firefox/addon/foxyproxy-standard/
Once installed we setup Burp as a proxy using the port 8080

Now we should be able to browse to a resource in our browser and see the results processed by both Burp and Zap

Using this method you can chain more proxies together by simply adding an upstream proxy to Zap, wash and repeat as needed to chain as many as you wish. The only limitation is each proxy must allow upstream proxy settings.
Hope you enjoyed the tip, now get to testing all the things!
